There is a quiet kind of kitchen magic in recipes that transform scraps into something special. Sandwich Crust Garlic Rolls prove that you do not need fresh loaves or fancy ingredients to create a side dish that is crispy, aromatic, and deeply satisfying. By repurposing sandwich crusts or stale bread pieces, tossing them in garlicky herb butter, and baking until golden, you unlock a zero-waste treat that tastes like intention. These rolls are crisp at the edges, tender within, and fragrant with garlic and herbs—the perfect companion to soups, salads, or any meal that calls for a little extra comfort.
CULTURAL CONTEXT
Using stale bread to create something new is a tradition as old as cooking itself. From Italian panzanella to French pain perdu and Middle Eastern fattoush, resourceful cooks have long honored the principle that nothing edible should go to waste. In American home kitchens, sandwich crusts were often saved for stuffing, croutons, or breadcrumb toppings. This recipe carries that legacy forward, turning what might be discarded into a deliberate, flavorful side. It is a small act of culinary respect: proof that simplicity, when guided by care, can yield something both practical and delightful.
WHY THIS RECIPE WORKS
Zero-waste ingenuity: Uses bread pieces that might otherwise be discarded, reducing food waste while creating something delicious.
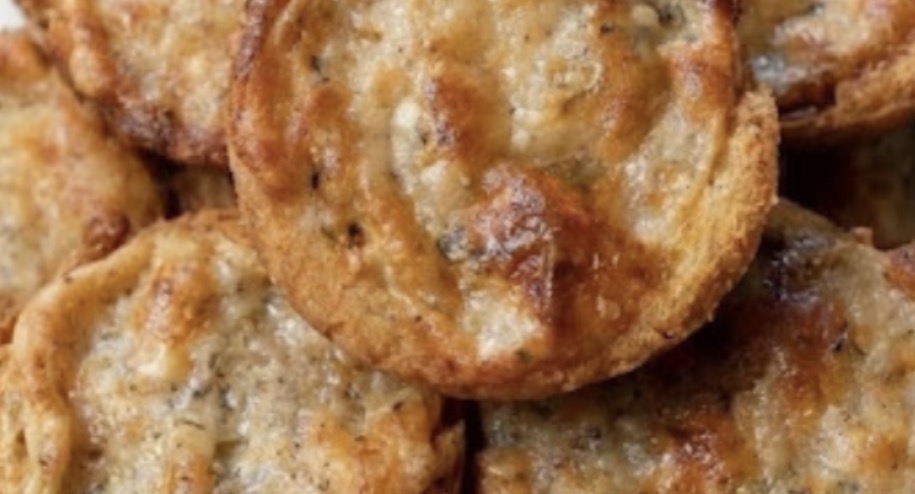
Texture contrast: Tearing (not slicing) the bread creates irregular edges that crisp beautifully in the oven while the centers stay tender.
Flavor layering: Melted butter carries garlic and herbs into every nook and cranny, ensuring each bite is aromatic and cohesive.
Flexible foundation: Works with white, wheat, or sourdough crusts; adaptable with optional add-ins like Parmesan or red pepper flakes.
Quick and forgiving: Minimal prep, no special equipment, and a short bake time make this accessible for any skill level.
Crowd-pleasing versatility: Pairs with nearly any meal and can be customized to match the occasion.
INGREDIENTS
(Serves 4–6 as a side)
4 cups torn sandwich crusts or stale bread pieces (white, wheat, or sourdough work well)
3 tbsp unsalted butter, melted
2 cloves garlic, minced (or ½ tsp garlic powder)
1 tbsp fresh parsley, finely chopped, or 1 tsp dried oregano
Pinch of fine salt
Optional: Grated Parmesan cheese, red pepper flakes, or sesame seeds for finishing
STEP-BY-STEP INSTRUCTIONS
Prep & Preheat: Position a rack in the center of your oven and preheat to 375°F (190°C). Line a large baking sheet with parchment paper for easy cleanup and to prevent sticking.
Make the Herb Butter: In a large mixing bowl, combine the melted butter, minced garlic (or garlic powder), herbs, and salt. Stir until the mixture is fragrant and well blended.
Toss the Bread: Add the torn bread pieces to the bowl. Using a large spoon or your hands, toss gently but thoroughly until every piece is evenly coated with the garlic-herb butter.
Bake to Golden Perfection: Spread the coated bread pieces in a single layer on the prepared baking sheet. Bake for 12–15 minutes, flipping halfway through, until the edges are deeply golden and crisp while the centers remain slightly tender. Watch closely during the final minutes to prevent burning.
Serve Warm: Remove from the oven and transfer to a serving bowl. If desired, sprinkle with grated Parmesan, extra herbs, or a pinch of red pepper flakes while still warm. Serve immediately for the best texture and aroma.
SERVING SUGGESTIONS
Classic pairings: Tomato basil soup, creamy broccoli cheddar, or a hearty beef stew
Salad companion: Toss alongside a crisp Caesar or Italian chopped salad for added crunch
Pasta night: Serve with spaghetti marinara or baked ziti as a garlicky side
Brunch upgrade: Pair with a frittata or scrambled eggs for a savory morning treat
Dipping options: Offer small bowls of marinara, garlic aioli, or olive oil for dipping
Occasion-ready: Casual weeknight dinners, potluck contributions, or zero-waste meal prep
YOU MUST KNOW
Slightly stale bread is ideal: Fresh bread can become soggy when tossed with butter. If using fresh bread, lightly toast the pieces first to dry them out.
Tear, don’t slice: Irregular edges created by tearing crisp more beautifully than uniform slices, adding textural interest.
Garlic is essential: Do not skip or reduce the garlic—it is the defining flavor of these rolls. If using fresh garlic, mince finely to avoid large, pungent bits.
Single layer matters: Crowding the pan traps steam and prevents crisping. Use two baking sheets if doubling the recipe.
Flip halfway through: Turning the pieces ensures even browning and prevents one side from burning while the other remains pale.
STORAGE TIPS
Room temperature: Store cooled rolls in an airtight container or paper bag for up to 2 days. They will gradually soften but remain flavorful.
Re-crisping: Refresh softened rolls in a 350°F oven for 3–5 minutes to restore crispness.
Freezer: Not recommended. The texture becomes chewy and the garlic flavor can intensify unpleasantly when frozen and thawed.
Make-ahead strategy: Prepare the herb butter and tear the bread up to 4 hours in advance. Store separately, then toss and bake just before serving for optimal texture.
Avoid refrigeration: Storing in the fridge can make the rolls tough and stale faster. Room temperature is best for short-term storage.
FREQUENTLY ASKED QUESTIONS
Q: Can I use fresh bread instead of stale?
A: Yes, but lightly toast the fresh pieces in a 300°F oven for 5–7 minutes first to dry them out. This prevents sogginess when tossed with butter.
Q: Can I make these dairy-free or vegan?
A: Easily. Replace unsalted butter with melted vegan butter or extra-virgin olive oil. Omit Parmesan or use a plant-based alternative.
Q: Why do my rolls burn on the edges before the centers crisp?
A: This usually happens if the oven runs hot or the pieces are too large. Tear bread into smaller, uniform pieces and check for doneness at the 10-minute mark.
Q: Can I add other flavors?
A: Absolutely. A pinch of smoked paprika, lemon zest, or dried rosemary complements the garlic beautifully. Add extras during the toss step to ensure even distribution.
Q: Can I use this method for croutons?
A: Yes. Cut the bread into smaller cubes, toss with the same herb butter, and bake for 8–10 minutes, stirring once, until golden and crisp throughout.
ALLERGY INFORMATION
Contains: Gluten (bread), dairy (unsalted butter, optional Parmesan)
Naturally: Egg-free, nut-free, soy-free
Substitutions:
Gluten-free: Use certified gluten-free bread or crusts
Dairy-free/vegan: Replace butter with plant-based butter or olive oil; omit or substitute Parmesan
Lower sodium: Reduce or omit added salt, especially if using salted butter or Parmesan
Always verify packaging for allergen statements and cross-contact warnings, as formulations vary by manufacturer and region.
FINAL THOUGHTS
Sandwich Crust Garlic Rolls are a quiet celebration of culinary resourcefulness. They do not demand perfection, exotic ingredients, or hours of attention. They only ask for a handful of honest scraps, a fragrant butter mixture, and the patience to let the oven transform them into something crispy, golden, and deeply comforting.
Make them when you have leftover bread, serve them alongside a simple soup, or keep the recipe ready for when you need a quick, zero-waste side that still feels intentional. If you try this recipe, I would love to hear how you serve them. Did you add a pinch of red pepper flakes? Pair them with a creamy tomato soup? Share your kitchen story, and if you know someone who appreciates the quiet elegance of waste-not cooking, pass this along.
Because sometimes, the most satisfying meals are not about doing more. They are about honoring what you already have, and letting a little heat, a little garlic, and a little care turn the ordinary into something quietly extraordinary.
With warmth and steady support,